


Adresse
1 rue de Saint-Petersbourg75008 Paris
Mail
contact@bam.techTéléphone
+33 (0)1 53 24 00 83When you are writing a test using React Native Testing Library, you can easily get confused on what function you can use. ++code>getBy++/code>, ++code>findBy++/code>, and ++code>queryBy++/code> are all used to get a specific element on the screen you’re testing. They may be similar, but their purpose and the way they can be used are actually pretty different.
++code>getBy++/code> returns the first matching node for a query, and throws an error if there’s zero or multiple element matches.
If you want to make sure there is a specific element on the screen you’re testing, you can use ++code>getBy++/code> to get an element and use ++code>expect(...).toBeTruthy()++/code> to make sure there’s a match for it.
There is also a matcher called ++code>toBeOnTheScreen()++/code> in the ++code>@testing-library/jest-native++/code> library that can replace ++code>toBeTruthy()++/code>. It is more explicit than ++code>toBeTruthy()++/code> and make the tests more readable. You can follow this documentation to use additional matchers.
The return type for ++code>getBy++/code> functions is the generic type ++code>T++/code>, so you can also use the element you’re getting as a return value from the function to fire actions on it.
++code>queryBy++/code> is actually similar to ++code>getBy++/code> because it also returns the matching node for a query. However, it returns ++code>null++/code> if there’s no element match, and throws an error if there are multiple matches.
With that difference, ++code>queryBy++/code> can be used to make sure a specific element is not on the screen you’re testing.
Although you can achieve an equivalent result with ++code>getBy++/code> by using ++code>expect(...).toThrow()++/code>, using ++code>expect(...).toBeFalsy()++/code> with ++code>queryBy++/code> makes the code more explicit, easier to read and provides better error messages. But, similarly to what was explained for ++code>getBy++/code>, you can use the ++code>toBeOnTheScreen()++/code> matcher from ++code>@testing-library/jest-native++/code> to get an even more explicit code. You just have to use ++code>not++/code> in combination with ++code>toBeOnTheScreen()++/code>.
Unlike ++code>getBy++/code> and ++code>queryBy++/code>, ++code>findBy++/code> returns a promise, which resolves to a matching node when the element is found. The promise is rejected if no element is found after a 1000ms timeout, which can be overwritten in the third parameter of the method. It will also be rejected if there are multiple element matches.
It can be useful if you’re making API calls in your app and have to wait for the call to be over to make sure you have a specific element.
All of these functions throw an error if more than one match is found… Unless you use the key word ++code>All++/code> in them. That means you can use ++code>getAllBy++/code>, ++code>queryAllBy++/code> and ++code>findAllBy++/code>.
By doing so, instead of getting one matching node, you get an array of them. You can use that array to check if you have the expected amount of a specific element and/or fire actions on some of them.
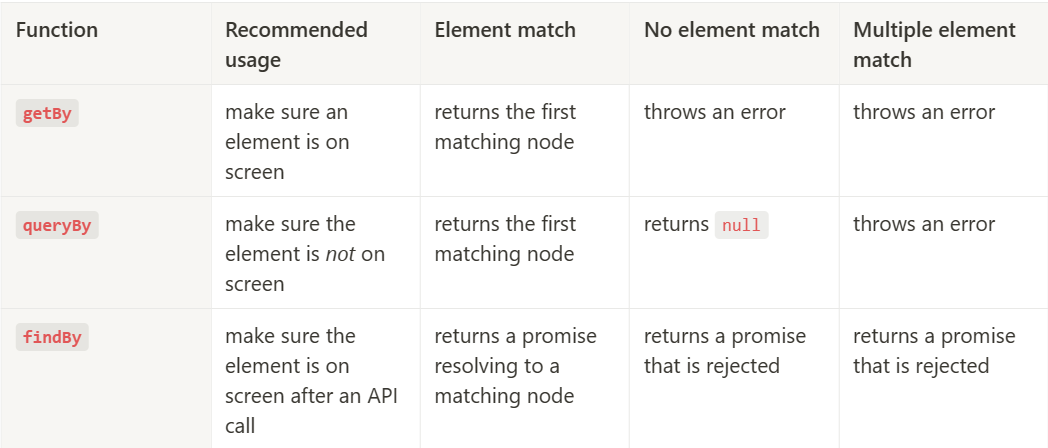
There is a lot a information in this article and it can get confusing. So, here is a table that sums up how and when to use each of these functions:
For the reasons stated before, using ++code>queryBy++/code> to make sure an element is not present is actually part of good practices when it comes to writing tests. ESLint rules are available to enforce these good practices. Here is an an example of a ESLint rule you can use:
This rule will ensure the linter throws an ESLint error each time a ++code>getBy++/code> is used for a null element, as explained in the documentation here. Check out more available rules and how to install them on this GitHub repository.
To learn more good practices when it comes to writing tests, check out our article on Refactoring Tests.
React Native Testing Library has many more queries and features. You can visit the official website of their documentation here.


Le BAM Innovation Lab, pour rester à la pointe des dernières innovations tech et produit !


