


Adresse
1 rue de Saint-Petersbourg75008 Paris
Mail
contact@bam.techTéléphone
+33 (0)1 53 24 00 83How do you test your React Native app? Are you using Enzyme and doing mostly unit tests? Well we've done that for quite some time at BAM and at some point, we decided to change. Indeed this way of testing raised 3 issues:
That's why at the beginning of a new project, my team and I wondered: why not try to use something that will fix those issues? And the "something" happens to be react-native-testing-library.
react-native-testing-library is a small library compatible with jest that enables you to write tests similar to the way your React Native application is used. It is inspired by react-testing-library, one of the standards to test React apps. Its author Kent C Dodds explains that: "The more your tests resemble the way your software is used, the more confidence they can give you". That means your tests should be as independent as possible from implementation details.
Why?
With react-native-testing-library, we will mainly write "integration tests". By integration test, I mean a test testing a small functionality inside a page. It starts with an interaction between the user and the app and ends with a visual feedback.
It's not unit testing because we won't just test our UI component but all the code involved in this functionality (redux / api calls etc.). We will need to mock the native code as well as the HTTP calls though.
If you want to try out the library on your own project, install it by running:
++pre>yarn add --dev react-native-testing-library++/pre>
If you just want to see what it can do, I made a small demo app. To follow along you can clone my repository. Then follow the instructions in the README to get everything up and running:
++pre>git clone https://github.com/MattAgn/NewsletterApp.git++/pre>
Here is what the app looks like:

It is a single screen app where you can enter an email to subscribe to a newsletter. If you enter a valid email, you have a success message. If your email is badly formatted, you'll receive an error message. For simplicity's sake, the Subscription API used does not really subscribe you to any newsletter. It only checks whether the email given is properly formatted or not.
I was gonna give you the code for the page but we don't really need it. After all I just said we would write tests independent from implementation details. Let's prove it!
Once you have cloned the repository, open it in your favorite text editor and open the file src/basic-version/pages/Home/__tests__/Home.test.tsx. That's where we'll write our test. You don't have to look at the other files just yet.
We need a few things to write our tests, let's import them :
++pre>++code>import React from 'react';
import fetchMock from 'fetch-mock';
import { render, waitForElement, fireEvent } from 'react-native-testing-library';
import { NEWSLETTER_ENDPOINT } from '../../../../complex-version/api/config';
import { Home } from '../Home';
import { wording } from '../../../../utils/wording';++/pre>
Here is the code to test a successful newsletter subscription:
++pre>test("should display successful message on successful subscription", async () => {
fetchMock.post(NEWSLETTER_ENDPOINT, 200);
const page = render(<Home />);
const EmailInput = page.getByPlaceholder(wording.emailPlaceholder);
const ValidateButton = page.getByText(wording.validateEmail);
fireEvent.changeText(EmailInput, 'hello@bam.co');
fireEvent.press(ValidateButton);
const SuccessMessage = await waitForElement(() =>
page.queryByText(wording.subscriptionSuccessful)
);
expect(SuccessMessage).toBeTruthy();
})++/pre>
Let's see what each line does now!
++pre>fetchMock.post(NEWSLETTER_ENDPOINT, 200);
const page = render(<Home />);++/pre>
The first thing we do is mock everything that needs to be mocked. In our case, it is the HTTP call to our Subscription API. For that, we will use fetchMock and simply mock the HTTP call and tell fetch to return a 200 response when it is called. It is important to note that we could be more precise. We could check the request parameters as well and send a custom response if required.
Then we render the page and save it in a constant. It will provide us with some utilities to look into our DOM.
Next step is to find out what the user sees when he arrives on the page and which elements he will interact with. Here, we see an input with an email placeholder, so that's what we look for, just as the user would. We do the same for the button and get it by its text.
++pre>const EmailInput = page.getByPlaceholder(wording.emailPlaceholder);
const ValidateButton = page.getByText(wording.validateEmail);++/pre>
As you can see, we're not fetching the elements with ids or css classes, the user does not know all that. If we were to look for an id for example, someone might inadvertently change the wording of the button. Then the test would still pass even though the user won't be able to see the correct button anymore.
However, there are indeed cases where using the id is the only way. For example when you want to find an element that does not have any text, label or any other property which could help you find it.
Now that we found our components in our DOM, it's time we interact with them. First, the user changes the text inside the email input and then presses the validate button.
++pre>fireEvent.changeText(EmailInput, 'hello@bam.co');
fireEvent.press(ValidateButton);++/pre>
fireEvent is a method provided by react-native-testing-library. It enables you to fire pretty much any native-like event in your DOM.
Finally we wait for the success message to appear on the page and check that it does appear in the DOM.
++pre>const SuccessMessage = await waitForElement(() =>
page.queryByText(wording.subscriptionSuccessful)
);
expect(SuccessMessage).toBeTruthy();++/pre>
waitForElement is a method provided by react-native-testing-library that either waits for your element to appear or times out. It is very useful each time you have asynchronous code running.
You can notice the use of queryByText and not getByText that we used earlier. getByText throws an error if it does not find the element while queryByText returns "undefined" if it does not find it. That's why we use queryByText every time we want to assert the presence of an element with expect afterwards.
Do you remember you still haven't seen the code? Now is the time to show you! For the app we just wrote a test for, I actually wrote 2 different implementations. The first one is very basic with only local state and basic components. The second one is more complex and uses redux, sagas, formik and toaster messages. And guess what? The tests are the same for both implementations!
Well almost the same. Since the complex version uses redux, we need to add a Redux Provider wrapping the page. And it also uses a toaster rendered outside the page so we have to include it as well. This is something that we will have to do for every test so let's just make a helper that will do the job.
++pre>export const renderPage = (page: ReactElement) => {
const sagaMiddleware = createSagaMiddleware();
const store = createStore(rootReducer, applyMiddleware(sagaMiddleware));
sagaMiddleware.run(watchAll);
return render(
<Provider store={store}>
{page}
<Toaster />
</Provider>
);
};++/pre>
As you can see, we are not mocking the store nor the sagas. Everything is running as it usually would in your app. That means more chances to catch a bug concerning the connection between our component and our sagas for example.
All we have to do now is replace the render method we used in the first test and use our renderPage helper instead. Here is the final code for this second test:
++pre>test("should display successful message on successful subscription", async () => {
fetchMock.post(NEWSLETTER_ENDPOINT, 200);
const page = renderPage(<Home />);
const EmailInput = page.getByPlaceholder(wording.emailPlaceholder);
const ValidateButton = page.getByText(wording.validateEmail);
fireEvent.changeText(EmailInput, 'hello@bam.co');
fireEvent.press(ValidateButton);
const SuccessMessage = await waitForElement(() =>
page.queryByText(wording.subscriptionSuccessful)
);
expect(SuccessMessage).toBeTruthy();
})++/pre>
Ok so let's sum up everything. So far we've written two tests to verify that the subscription works. One for the basic version and another for the complex one. It's now easy for you to write the last two tests to check the case where the subscription fails for both versions. In total that makes 4 tests, each about 9 lines long.
It is time to check out what code coverage we get with these 4 tests. To do so, go at the root of the project and run :
++pre>yarn jest --coverage++/pre>
You should see something like the following :
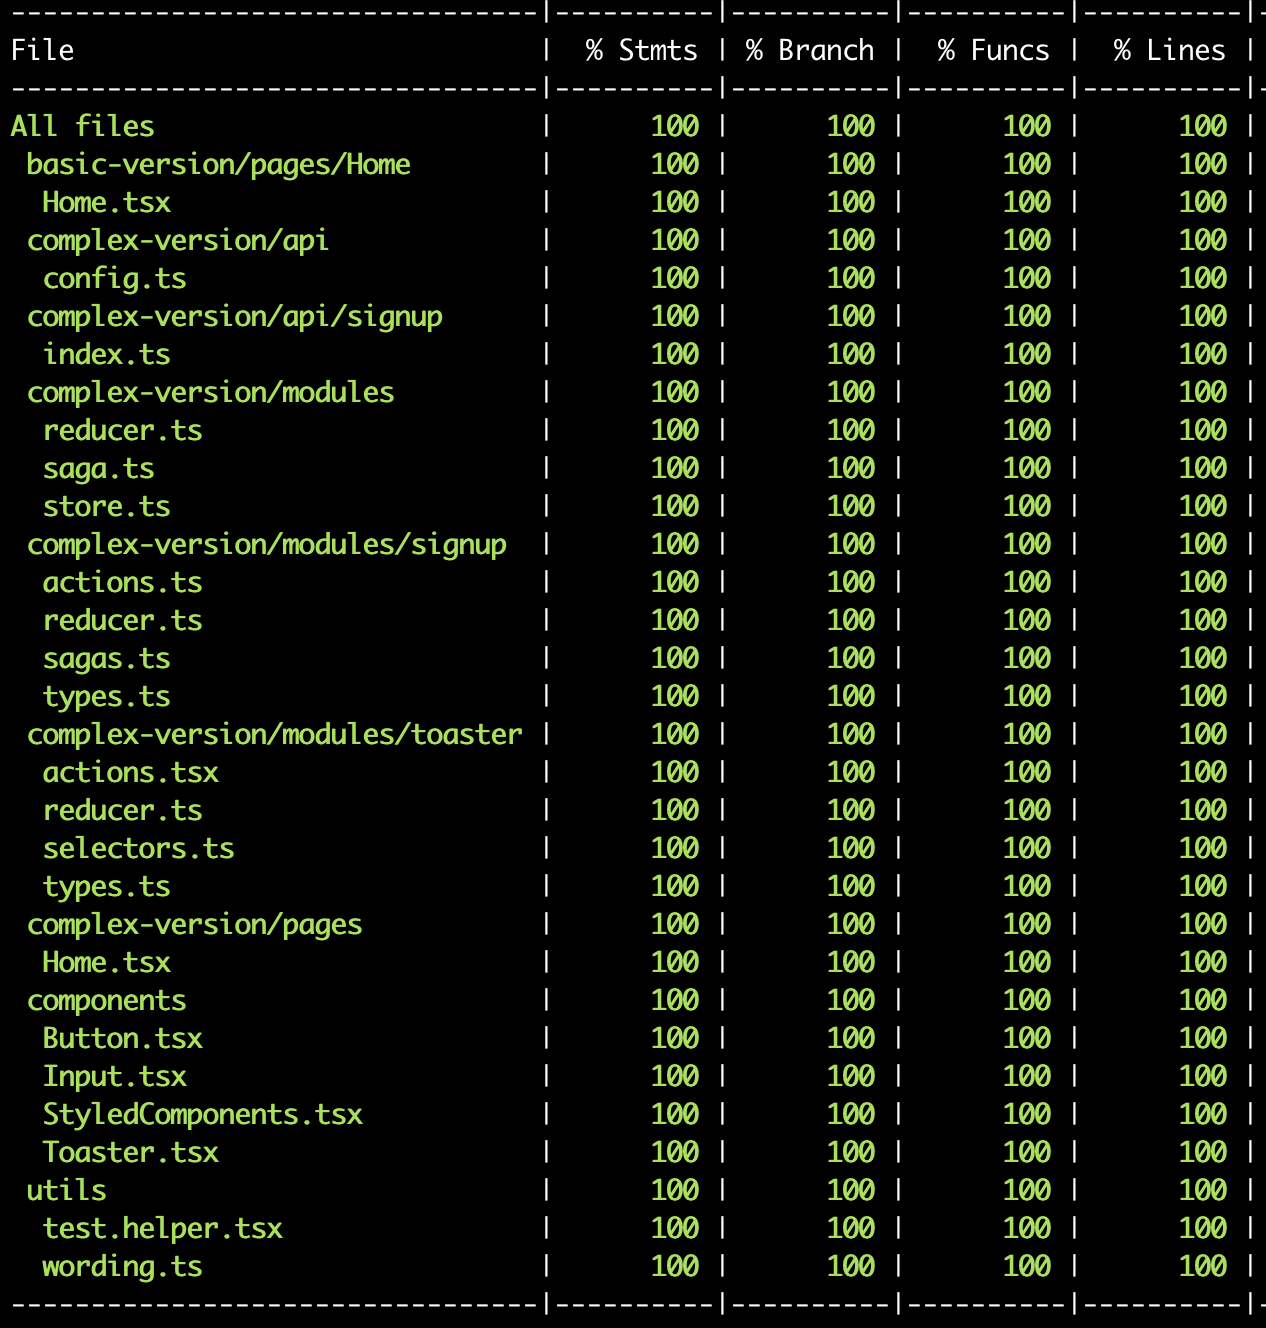
As you can easily notice, we obtained a 100% coverage! Hooray!! But if I show you that, it's not to tell you that you can get 100% coverage on your app with react-native-testing-library. Indeed some rare scenarios and functions are still hard to test with this library.
No, what I wanted to show you with the coverage was that we did go through all our code. Our tests passed through our reducer, our actions, formik etc... That means the different pieces of our app are working together just as they would when the user uses the app.
After writing some tests with react-native-testing-library, we chose the following test strategy:
You may wonder why we don't write unit tests covering our data flow (like redux or apollo). Well it's just because we don't really need them. Thanks to the great debugging tools we have now, it's quite easy with an integration test to find out where the bug lies.
Tell me in the comments what you think about this test strategy!
I would be lying if I said we had a perfect time writing tests with react-native-testing-library so far in our team. It has its pros and cons.
To sum up, we had quite some difficulties at first writing tests with react-native-testing-library and took some time to set everything up. However it all proved worth it after some time. We can now write integration tests quickly that give us the confidence they are intended for. Besides, we have a test strategy where we are writing fewer tests than before without losing coverage.
If you want to know more about the philosophy and the reasons behind react-testing-library, I recommend these articles written by Kent C Dodds:
Want to commit to your open-source project? Read my last article: How I made open-source a habit in 6 steps


Le BAM Innovation Lab, pour rester à la pointe des dernières innovations tech et produit !


