


Adresse
1 rue de Saint-Petersbourg75008 Paris
Mail
contact@bam.techTéléphone
+33 (0)1 53 24 00 83For the application of one of our clients, we had to find and implement a solution to limit the simultaneous screen count in use from each user account. We have an iOS and android application and a website developed with flutter, and we want the solution to apply to these three targets. As the app is subscription-based, we only want a user to be able to use it on two devices simultaneously.
What we are trying to achieve here is, if a user already uses the application on 2 devices:
I decided to present the solution we chose and the implementation steps in this article.
The app on which we implemented this solution already used Firebase authentication and Firestore Database, so using Realtime Database was an obvious choice for us.
.gif)
Firstly, you need to create a Realtime Database on your Firebase console. You can start by putting your rules in test mode, which allows anyone with the URL to read and write data but don't worry, we'll change that later.
For now, the goal is to connect our app to this newly created database. You can do this easily with Flutterfire CLI:
This generates a firebase_options.dart file which you will use in your main function when initializing Firebase :
++pre>++code>WidgetsFlutterBinding.ensureInitialized();
await Firebase.initializeApp(
options: DefaultFirebaseOptions.currentPlatform,
);
++/code>++/pre>
To do this, you must add the firebase_database dependency to your ++code>pubspec.yaml++/code> file.
We thought of the following solution about how we will organize the data in this database:
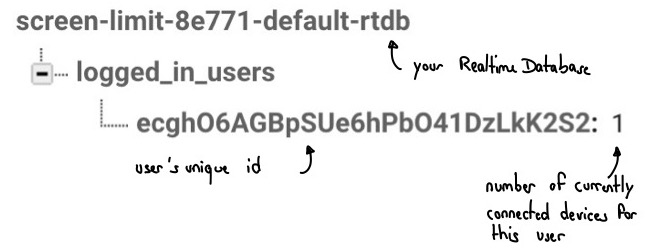
Users will write under ++code>logged_in_users++/code> the number of screens connected to the user account next to the user's unique id.
We will use the rules tab to implement the logic behind the solution. We want the user not to be able to add a connected device if the value is above 2. This is ensured by the following rules. The user will only be able to write on the database if the value he sent is under or equals 2, meaning they can only have 2 simultaneous connections.
++pre>++code>{
"rules": {
".read": false,
".write": false,
"logged_in_users":{
"$uid":{
".validate": "newData.isNumber() && newData.val()<=2 && newData.val()>=0",
".read": true,
".write": true
}
}
}
}
++/code>++/pre>
Our app state management is handled with Bloc, so our approach for this solution is to create a Bloc named ++code>ScreenLimitBloc++/code> that will be in charge of the logic behind this.
Our app can be in 3 different states that we are going to define in a ++code>screen_limit_state.dart++/code> file:
Given these explanations, you should have the following file now:
++pre>++code>part of 'screen_limit_bloc.dart';
@immutable
abstract class ScreenLimitState {}
class ScreenLimitInitial extends ScreenLimitState {}
class DeviceCountCorrect extends ScreenLimitState {}
class DeviceCountOverLimit extends ScreenLimitState {}++/code>++/pre>
Now, to put the Bloc in the correct or over limit state, we should have an event called ++code>CheckDeviceCount++/code> that will call a function to check whether the user can log in. We will implement that function later. You should have a ++code>screen_limit_event.dart++/code> file looking like this :
++pre>++code>part of 'screen_limit_bloc.dart';
@immutable
abstract class ScreenLimitEvent {}
class CheckDeviceCount extends ScreenLimitEvent {}++/code>++/pre>
Now let's move on to the important part: creating the Bloc. In a new file called ++code>screen_limit_bloc.dart++/code>, you can create a Bloc called ++code>ScreenLimitBloc++/code>:
++pre>++code>??class ScreenLimitBloc extends Bloc<ScreenLimitEvent, ScreenLimitState> {
ScreenLimitBloc({}) : super(ScreenlimitInitial()) {
on<CheckDeviceCount>(_onCheckDeviceCount);
}
}
++/code>++/pre>
The function ++code>_onCheckDeviceCount++/code> is called each time you add the ++code>CheckDeviceCount++/code> event to the Bloc. Basically, it sets the Firebase Database reference to tell the function where to read and write on the realtime database, and then check if the user can login. To get the reference, we must recover the actual user's id.
To read and write data on the database, we must get the ++code>DatabaseReference++/code> first, and we can do so with the following command:
++pre>++code>final userId = _authenticationRepository.currentUser.id;
ref = FirebaseDatabase.instance.ref('logged_in_users/$userId/');
++/code>++/pre>
This allows us to use the ++code>get()++/code> method to recover the database value and the ++code>set(value)++/code> method to set a new value on the database.
To do that, we add the authentication repository as a dependency of the Bloc:
++pre>++code>class ScreenLimitBloc extends Bloc<ScreenLimitEvent, ScreenLimitState> {
ScreenLimitBloc({
required AuthenticationRepository authenticationRepository,
}) : _authenticationRepository = authenticationRepository,
super(ScreenLimitInitial()) {
on<CheckDeviceCount>(_onCheckDeviceCount);
}
}
++/code>++/pre>
So we can now write our function :
++pre>++code>Future<void> _onCheckDeviceCount(
CheckDeviceCount event,
Emitter<ScreenLimitState> emit,
) async {
if (state is ScreenLimitInitial) {
final userId = _authenticationRepository.currentUser.id;
ref = FirebaseDatabase.instance.ref('logged_in_users/$userId/');
deviceCountExceeded = false;
await ref
.set(ServerValue.increment(1))
.onError<FirebaseException>((error, _) async {
if (error.code == 'permission-denied') {
deviceCountExceeded = true;
return _onScreenNumberExceeded(emit, ref);
}
});
if (!deviceCountExceeded) {
emit(DeviceCountCorrect());
}
}
}
++/code>++/pre>
This works well with the realtime database rules that we defined earlier (the ++code>validate++/code> line). The trick was to use the ++code>.set(ServerValue.increment(1))++/code> so that the front did not handle all the logic. The Bloc has no idea of the server value. Still, if the request is rejected by the database (meaning that the value is above 2), the user already has his maximum simultaneous connections. This is great because if we try to connect 3 devices simultaneously, the request will always be rejected on one of them. Whereas if we were reading the value first and then doing all the logic in the front and not by rules, we could have issues when we launch the application at the same time on multiple devices.
The next thing to handle is decreasing the server value by 1 when the user logs out. We are going to add an event to the ++code>screen_limit_event.dart++/code> file :
++pre>++code>class DecreaseDeviceCount extends ScreenLimitEvent {}
++/code>++/pre>
Let's add a function to the Bloc that will be called when this event is added:
++pre>++code>on<DecreaseDeviceCount>(_onDecreaseDeviceCount);
...
Future<void> _onDecreaseDeviceCount(
DecreaseDeviceCount event,
Emitter<ScreenLimitState> emit,
) async {
if (state is ScreenLimitCorrect) {
await ref.set(ServerValue.increment(-1));
emit(ScreenLimitInitial());
}
}
++/code>++/pre>
This function will do the trick if everything goes well, but what if the app crashes or the user kills the app without disconnecting himself? Those are cases you want to handle, and that's where the ++code>onDisconnect++/code> method comes on stage. According to Google's documentation : the OnDisconnect class is used to manage operations that will be run on the server when this client disconnects. It can be used to add or remove data based on a client's connection status. It is very useful in applications looking for 'presence' functionality. That's exactly what we are trying to achieve here.
To implement this, just add this line in the ++code>_onCheckDeviceCount++/code> function, before emitting the ++code>DeviceCountCorrect++/code> state:
++pre>++code>await ref.onDisconnect().set(ServerValue.increment(-1));
++/code>++/pre>
?? You also want to add a ++code>ref.onDisconnect().cancel()++/code> when the user disconnects, otherwise if he kills the app right after being disconnected, his screen count would decrease by 2.
We're almost done here, there are just 2 more functions to write. The first one is to handle the case where the Bloc goes into ++code>DeviceCountOverLimit++/code> state, and that's the function we called earlier ++code>_onDeviceCountExceeded++/code>:
++pre>++code>Future<void> _onDeviceCountExceeded(
Emitter<ScreenLimitState> emit,
DatabaseReference ref,
) async {
emit(DeviceCountOverLimit());
emit(ScreenLimitInitial());
}
++/code>++/pre>
We will later listen for those state changes to react to it to force the user's disconnection. This way, we don't handle the disconnection logic in our Bloc.
The last thing to do is to add events to this Bloc depending on the authentication repository changes:
To do so, we will add the ++code>authentication_repository.user++/code> subscription to our ++code>ScreenLimitBloc++/code> :
++pre>++code>late StreamSubscription userSubscription;
void listenToUserChanges() {
userSubscription = _authenticationRepository.user.listen((user) {
if (user == User.empty) {
add(DecreaseDeviceCount());
} else {
add(CheckDeviceCount());
}
});
}
++/code>++/pre>
You have to call this ++code>listenToUserChanges++/code> function when you initialize your Bloc (just below the ++code>on<DecreaseDeviceCount>(_onDecreaseDeviceCount);++/code> line).
There you go, all you have to do is add your ++code>ScreenLimitBloc++/code> with ++code>BlocProvider++/code> and wrap your app with a ++code>ScreenLimitListener++/code> in your ++code>app.dart++/code> file :
++pre>++code>class ScreenLimitListener extends StatelessWidget {
const ScreenLimitListener({Key? key, required this.child}) : super(key: key);
final Widget child;
@override
Widget build(BuildContext context) {
return BlocListener<ScreenLimitBloc, ScreenLimitState>(
listener: (context, state) {
if (state is DeviceCountOverLimit) {
context.read<AppBloc>().add(AppLogoutRequested());
ScaffoldMessenger.of(context)
..hideCurrentSnackBar()
..showSnackBar(
const SnackBar(
content: Text('Ooops, too many simultaneous screens'),
),
);
}
},
child: child,
);
}
}
++/code>++/pre>++pre>++code>BlocProvider(
create: (_) => ScreenLimitBloc(
authenticationRepository: _authenticationRepository,
),
)
...
class AppView extends StatelessWidget {
const AppView({Key? key}) : super(key: key);
@override
Widget build(BuildContext context) {
return MaterialApp(
theme: theme,
home: ScreenLimitListener(
child: FlowBuilder<AppStatus>(
state: context.select((AppBloc bloc) => bloc.state.status),
onGeneratePages: onGenerateAppViewPages,
),
),
);
}
}
++/code>++/pre>
The ++code>ScreenLimitListener++/code> is responsible for disconnecting the user if the state of the ++code>ScreenLimitBloc++/code> is ++code>DeviceCountOverLimit++/code>, and for showing a little snack bar that indicates to the user what was the reason he was disconnected.
If you want to see the concepts we applied in this article, feel free to look at this repository, and, more specifically, at this commit where we added the whole screen limit logic.
This method allowed us to prevent simultaneous login of the same user on multiple devices in a relatively simple way. Indeed, if you check the commit where we added all this logic from a basic authentication app, you will see that it's not even 200 lines of code. That's ridiculously low for such an important feature!
You can check this little experiment of the solution in real conditions:
.gif)
Finally, although I use Firebase authentication in this solution in the ++code>listenToUserChanges++/code> function to detect any user changes (via the ++code>firebaseAuth.authStateChanges++/code> method), any method like oauth or even a personal authentication method should do the trick if you adapt the ++code>listenToUserChanges++/code> to listen to your particular state.


Le BAM Innovation Lab, pour rester à la pointe des dernières innovations tech et produit !


