


Adresse
1 rue de Saint-Petersbourg75008 Paris
Mail
contact@bam.techTéléphone
+33 (0)1 53 24 00 83Your project is organized though different technical services e.g. back-office, front-end application, back-end application, database.
While you could run all these services at once on one server, wouldn't it be nice to make them live separatly? Then you could manage each of your technical services individually:
Still, it is really difficult to make them live separately on several physical servers in terms of security and portablilty. Docker may be the solution: it lets you separate your architecture in several autonomous services. You can get more information about Docker Use Cases here. By the way, if you wonder what will happen to all your great webpack plugins such as React-hot-loader, don't worry we'll get it covered ;)

For this tutorial, you will need Docker and Docker-compose.
For this tutorial, let's assume we own a simple React web-application supported by three services :
The following diagram represents the current stack.

You might have experienced that using a lot of different ports is confusing while developping services locally : it often involves cross-origin resource sharing which need to be allowed. Cross-origin resource sharing let another domain access your data. When you need to access your data from a different domain, you need to allow this domain to query the data.
First, let's containerize these three services. Create the ++code>docker++/code> directory, and one Dockerfile per development service:
We create our Dockerfile with these characteristics:
++pre>++code>? docker
│ ...
└ ? app
└ ? Dockerfile.dev
++/code>++/pre>
++pre>FROM node:8.1.0-alpine
WORKDIR /usr/src/app
EXPOSE 3000
CMD ["yarn", "run", "start"]++/pre>
Here we use one Alpine image in which node lives. In your project, your free to find more usable Docker image such as Ubuntu for example.
We create our Dockerfile with these characteristics, very similar to our App service characteristics:
++pre>++code>? docker
│ ...
└ ? api
└ ? Dockerfile.dev
++/code>++/pre>
++pre>FROM node:8.1.0-alpine
WORKDIR /usr/src/api
EXPOSE 8080
CMD ["yarn", "run", "serve"]++/pre>
Modify your api ++code>package.json++/code> scripts to add the following line; it will run migrations and seed our database on startup !
++code>"serve": "sequelize db:migrate && sequelize db:seed:all && nodemon index.js"++/code>
We'll use postgres official container.
++pre>++code>? docker
│ ...
└ ? db
├ ? psql.env
└ ? Dockerfile.dev
++/code>++/pre>
We first need to create a ++code>psql.env++/code> configuration file.
++pre>++code>POSTGRES_USER=myappuser
POSTGRES_PASSWORD=myapppassword
POSTGRES_DB=myappdb
PGDATA=/data
++/code>++/pre>
Finally, we create our Dockerfile with these characteristics:
++pre>FROM postgres:9.5++/pre>
Now let's think about how our services should run in our production environnement :
In order to achieve our goal (which is to make each of our services manageable), we use Docker to containerize them. The target container architecture is given here:

One of our standard at BAM is to be as iso-production as possible when developping. On one hand, it ensures we share the same specification on our machines and on the staging/production servers and reduce regression risk when pushing to remote servers. On the other hand, we should not forget efficient development tools: running Docker services on our machine should not slow down features development.
Instead of building the entire architecture each time we make a change in our code, we would still use our Webpack development server. The following diagram shows our development architecture (differences with target architecture are showed in green):
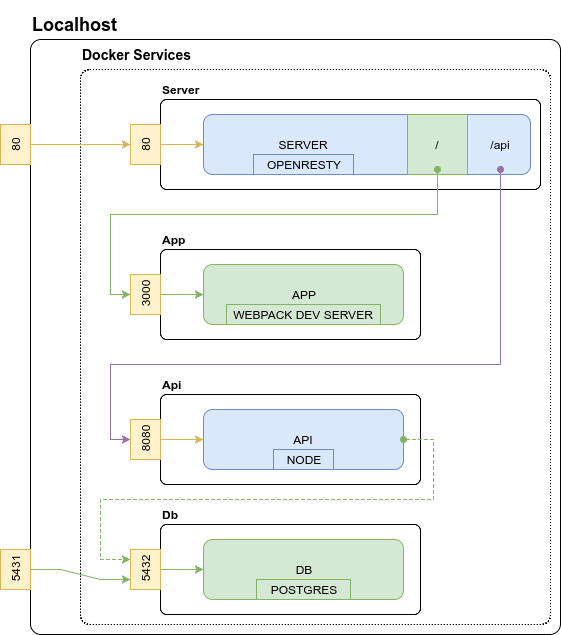
++table>++thead>++tr>++th>+++/th>++th>-++/th>++/tr>++/thead>++tbody>++tr>++td>Fast and efficient development++/td>++td>One level of abstraction added++/td>++/tr>++tr>++td>Fully iso between developpers (the way the code is executed is the same)++/td>++td>Not iso-production (but good effort is made)++/td>++/tr>++tr>++td>See services logs in one place organised by color++/td>++td>++/td>++/tr>++tr>++td>Clear definition of services++/td>++td>++/td>++/tr>++/tbody>++/table>
Drawing our architecture was an important step to achieve our goal! You'll see it makes our Docker container easier to write.
The following steps will lead you to execute the development environement on your machine.
We first create ++code>nginx.dev.conf++/code> file.
++pre>++code>? config
└ ? nginx
└ ? nginx.dev.conf
++/code>++/pre>
Declare connections to other services :
++pre>++code> upstream api {
least_conn;
server api:8080 max_fails=3 fail_timeout=30s;
}
upstream app {
least_conn;
server app:3000 max_fails=3 fail_timeout=30s;
}
++/code>++/pre>
Declare proxies:
++pre>++code> location / {
proxy_pass http://app;
proxy_http_version 1.1;
proxy_set_header Upgrade $http_upgrade;
proxy_set_header Connection 'upgrade';
proxy_set_header Host $host;
proxy_cache_bypass $http_upgrade;
break;
}
location ~ /api/(?<url>.*) {
proxy_pass http://api/$url;
proxy_http_version 1.1;
proxy_set_header Upgrade $http_upgrade;
proxy_set_header Connection 'upgrade';
proxy_set_header Host $host;
proxy_cache_bypass $http_upgrade;
}
++/code>++/pre>
Use ++code>Access-Control-Allow-Origin++/code> header to allow pre-flight request checks :)
++pre>++code> location ~* \.(eot|otf|ttf|woff|woff2)$ {
add_header Access-Control-Allow-Origin *;
}
++/code>++/pre>
The content of ++code>nginx.dev.conf++/code> will not be explained here as NGINX is not the purpose of this tutorial. However, my fullconfiguration file is given here.
Finally, we create our Dockerfile with these characteristics:
++pre>++code>? docker
└ ? server
└ ? Dockerfile.dev
++/code>++/pre>
++pre>FROM nginx
ADD /config/nginx/nginx.dev.conf /etc/nginx/nginx.conf
EXPOSE 80++/pre>
In our application example, you need to change the ++code>API_URL++/code> to ++code>/api++/code> in ++code>app/src/App.js++/code> at line 6:
++code>const API_URL = 'http://localhost/api';++/code>
You will need to change the way your api connect to our database locally. Change your host: previously ++code>127.0.0.1++/code> to ++code>db++/code> - isn't it beautiful? Docker taking care of hostnames ? ;-)
In our example, go to ++code>api/server/config/config.json++/code> and change line 6.
We now create the ++code>docker/docker-compose.dev.yml++/code> configuration file and connect our services.
++pre>++code>? docker
│ ...
└ ? docker-compose.dev.yml
++/code>++/pre>
++pre>version: '3'
services:
server:
build:
context: ../.
dockerfile: docker/server/Dockerfile.dev
image: myapp-server
deploy:
resources: # Set these values when you know what you do!
limits:
cpus: '0.001'
memory: 50M
reservations:
cpus: '0.0001'
memory: 20M
ports:
- '80:80' # Connect localhost 80 port to container 80 port
links: # Link services to access http://app and http://api inside the container
- api:api
- app:app
app:
build:
context: ../.
dockerfile: docker/app/Dockerfile.dev
image: myapp-app
environment:
- NODE_ENV=development
volumes: # For webpack dev server to use our local files
- ./../app:/usr/src/app
ports:
- '3000:3000' # For docker to now where to redirect HMR queries
api:
deploy:
resources: # Set these values when you know what you do!
limits:
cpus: '0.001'
memory: 50M
reservations:
cpus: '0.0001'
memory: 20M
build:
context: ../.
dockerfile: docker/api/Dockerfile.dev
image: myapp-api
environment:
- DB_NAME=myappdb
- DB_USER=myappuser
- DB_PASSWORD=myapppassword
- DB_HOST="db"
- DB_PORT=5432
- NODE_ENV=development
links:
- db:db
volumes:
- ./../api:/usr/src/api
ports:
- '8080'
depends_on:
- "db"
db:
build:
context: ../.
dockerfile: docker/db/Dockerfile.dev
env_file: db/psql.env
image: myapp-db
ports:
- '5431:5432'++/pre>
You can see in this file that we set resources limits: the hosting server will share its resources to these containers. Limiting resources prevent one container draining all resources leaving the others dying (more info here). You can either do this way or use Docker Compose version 2.
++pre>++code>? script
│ ...
└ ? 00-install-dev.sh
++/code>++/pre>
++pre>#!/usr/bin/env bash
set -e
# Build app and api containers
docker-compose -f docker/docker-compose.dev.yml build
# Launch the db alone once and give it time to create db user and database
# This is a quickfix to avoid waiting for database to startup on first execution (more details [here](https://docs.docker.com/compose/startup-order/))
docker-compose -f docker/docker-compose.dev.yml up -d db
sleep 5
docker-compose -f docker/docker-compose.dev.yml stop db
++/pre>
Make this script executable with the command ++code>sudo chmod 744 ./script/00-install-dev.sh++/code>
In our root ++code>package.json++/code> file, add the following scripts:
++pre>...
"scripts": {
"dev:install": "./script/00-install-dev.sh",
"dev:up": "docker-compose -f docker/docker-compose.dev.yml up",
"dev:down": "docker-compose -f docker/docker-compose.dev.yml down",
"dev:uninstall": "docker-compose -f docker/docker-compose.dev.yml down --rmi all",
"dev:connect:api": "docker exec -it target_api_1 /bin/sh",
"dev:connect:db": "psql -h localhost -p 5431 -U myappuser -d myappdb"
}++/pre>
Now you can use either one of the following commands:
Simply install your containers with ++code>yarn dev:install++/code>... and run ++code>yarn dev:up++/code> to gracefully launch all your services at once !
Visit localhost to see your app live !
Docker Compose launched every container accordingly to our configuration file. Once launched, every service print their logs in one single terminal. We made every service resource manageable and portable. Furthermore, we still use our efficient development tools !
You can have the final result at the ++code>containerfull++/code> branch of the repo of this tutorial.
You can create all scripts and derived Dockerfiles to release and deploy your containers in CI/CD !
You can first create ++code>nginx.prod.conf++/code> file, then create the ++code>docker/docker-compose.prod.yml++/code> configuration file. Get inspire by your development configuration and create the scripts needed in your CI/CD pipelines.
Cheers :)


Le BAM Innovation Lab, pour rester à la pointe des dernières innovations tech et produit !


